Recently I came across a video from a fellow YouTube Mom who demonstrated the Montessori way of teaching place value through layered cards. So I got inspired and stayed up a little bit late to make a set of my own. I happened to have a few stacks of blank "Word Strips" from the Dollar Tree laying around. They have traditional lines on one side and they are blank on the other. I chose to use the blank side because I figured it would be less distracting. You can cut your own cards from cardstock or posterboard, but I found it to be much easier to just have to cut the length.
Initially I thought about nice they would be if I printed them in color
on the computer, used my paper cutter (which is packed away at the moment), laminated them, etc... and then I
realized that a DONE project is better than a PERFECT project! So I
whipped it out in just an hour or two and while it's not perfect, it's still effective and that's what matters.
I color coded mine in Do Re Mi colors since my kids are already familiar with the sequence and I figured it would help them remember the order better. The cards weren't long enough for some of the bigger numbers, so I wrote on them first and then used packing tape to tape them together. They are relatively sturdy.
I included a small chart to set next to it to simplify reading the columns. My kids knew some of these already, but not up to a million. We have a spiral flip chart where all of the numbers are already connected, but this way of layering them is just more child friendly IMO. They can see everything at once and grab whatever they need, versus only being able to see one number at a time on the chart.
I measured out two inch lines to create a guide, which I
laid next to each card as I wrote on it. It's important that each column
is covered up properly when layering the cards so the numbers needed to
be sorta-kinda straight and evenly spaced. :)
Here's a link to the original video from YouTube Super Mom EarlyLearningAtHome who inspired me to make these cards. She is sooooo crafty, I'm sure you'll enjoy browsing her channel as much as I do!
As long as people learn to read, the "reading wars" will continue! You may be wondering if you should you teach your child through the whole words or phonics method. For me, the answer is pretty clear- use both!
We started our kids on sight reading when they were still learning to talk. Sight word, or whole word reading is typically easier to begin with a small baby than introducing phonics right off the bat. It's like showing them a whole building versus handing them a single brick, which better enables them to see the big picture. After they get a grip that text is a symbolic representation of spoken words, THEN show them the bricks (phonics) and how to build soon after. Some kids can learn to read from sight words alone, but I believe phonics should not be ignored.You can easily teach both at the same time.
My favorite reading product overall, Little Reader, combines the whole word method with pattern phonics. However, it is intended for young children and I would say it leans more in the direction of whole words overall. It is simply AMAZING for whole word vocabulary building in particular, no doubt, and kids are exposed to 3,000 words with corresponding pictures, actual videos, and animations over the course of a year. That vocabulary exposure alone is worth doing the program and most kids end up with a much larger spoken vocabulary and clearer speech as a result.
But for phonics instruction, my favorite program is Hooked on Phonics.
If you are a parent that wants a clear cut "cookbook" approach to teaching your child phonics, this is it. The program is broken up into 3 steps: Lesson, Practice, Read. It's a no-brainer and you truly don't need to know a THING about teaching a child to read to use this program, just follow the steps in the book. I took advantage of their monthly payment plan and never looked back. To see my daughter finish a SECOND GRADE curriculum at 2 years old and love every second of it makes this program worth it's weight in gold to me!
Here's an example of a kindergarten level DVD lesson:
Hooked on Phonics is great to use with young children because it teaches through example rather than explanation. My two year old would never have understood "When two vowels go walking, the first one does the talking" if I tried to explain it to her. You child may very well be ready for the DVD's before the workbooks, and that is fine! And you can use the phonics readers as well and just shelve the workbooks for a while. I didn't need to "explain" phonics to Lily...with a combination of videos, workbooks, and activity sheets that we used as coloring pages (I wrote in the words ahead of time and we talked about the page while we colored it), just teaching her the words worked beautifully for us! No long explanations needed, just clear demonstration.
I will never forget when Lily was about 24 months old and she toddled over the drawer where I kept the program. She opened the drawer, which was no small feat for her, and then brought it to me on the couch where I was chatting with a guest and said "do phonics, Mama?" I told her we could play Hooked on Phonics after our company left but she would have to wait. Her little lip puffed out and began to quiver, her eyes welled with tears, and a fire engine wail soon followed. My friend and I were so entertained by this scene...my 2 year old was having a temper because I told her she couldn't do phonics!!
Lily at 24 months old doing her Hooked on Phonics Workbook:
The full pre-K to second grade "Learn to Read" kit:
THE LEARN TO READ PROGRAM INCLUDES:
8 DVDs
36 original storybooks
8 workbooks
Flashcards
Motivation stickers
Interactive online tools
The Quick Start Guide Book and video
Bonus Fun Pack
FREE Shipping and processing
Money Back Guarantee
The Hooked on Phonics program greatly improved my daughter's reading stamina, it naturally discouraged word guessing (something most kids go through), gave her lots of confidence, and allowed me to scan for holes in her decoding skills. As it turns out, there were hardly any! But, the program was invaluable to us. In the beginning, we only did a single *page* at a time but by the time she finished the series, she was speeding through 2 entire lessons in a sitting. It was a investment that was very well worth my time and money, she just grew leaps and bounds.
An example of a first grade Hooked on Phonics DVD lesson:
My son watched the Hooked on Phonics DVD's from a very young age on account and I never needed to do the workbooks with him as a result of being exposed to the lessons so young. he already knew how to read all of the words in them so there was no need! The DVD portion was actually the main reason I bought the program because at the time Lily was too little for workbook based phonics instruction. We typically watched one DVD lesson directly in the morning (about 5 minutes long) during breakfast and then I might turn on the lessons on in the background while they played using the "repeat all" feature on my DVD player (the chapters do not auto advance). Owen decoded the word "crime" at about 17 months old while watching a Hooked on Phonics DVD before the word was even announced on screen, and that was a word I KNEW I never personally taught him!
Since finishing the Learn to Read program, we are now using Hooked on Spelling and Hooked on Phonics Master Reader. I am happy with all of them! Here's a Hooked on Spelling video demo and some footage of my son using the software.
Here are the Hooked on Spelling materials:
We adjusted Master Reader program somewhat to better fit my kids, for
example, skipping the chapter books because they are simply too long at
the moment. But they are very capable of doing the Master Reader
software and my daughter also does the double sided reading cards.
Hooked on Phonics Master Reader materials:
I think so highly of this company and when the kids finish their current programs,
I plan to go hunt down an out of print "classic" version of Hooked On Phonics Reading Power SRA on ebay. I saw
it once at a thrift shop and have kicked myself ever since for not
buying it! The Reading Power program focuses on reading comprehension
and will be the next logical
step for them to continue to develop their skills.
All in all, I definitely recommend checking Hooked on Phonics trial. It's been an amazing part of my children's literacy journey and I hope it helps your children, too!
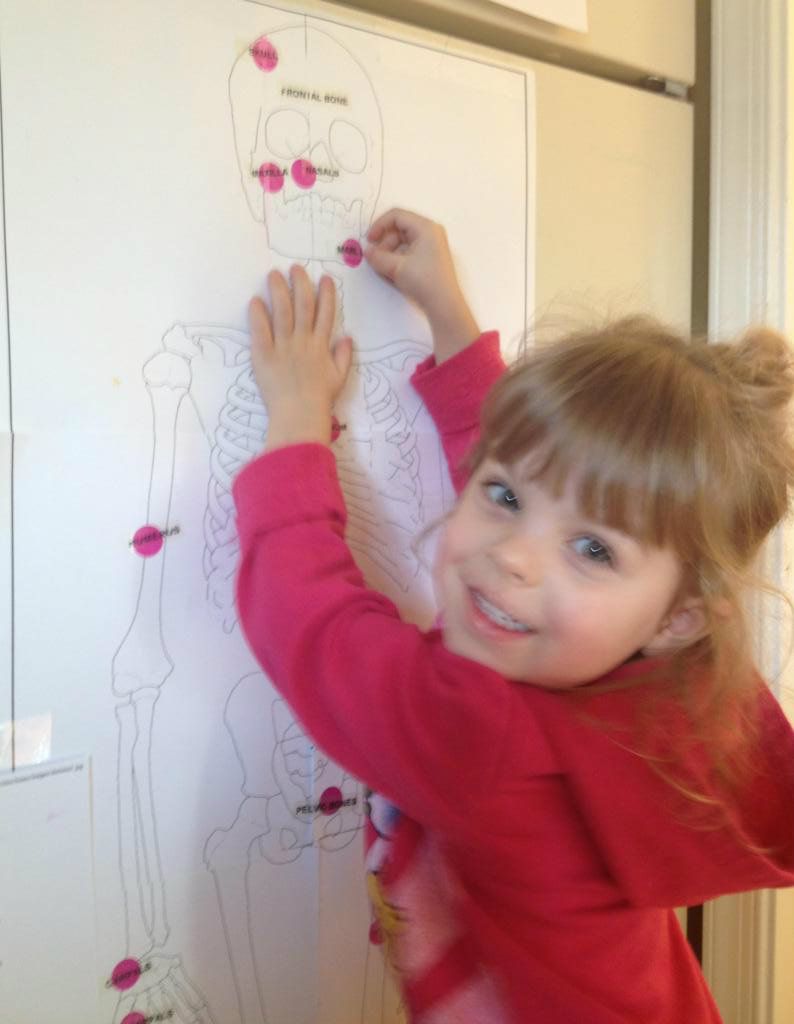
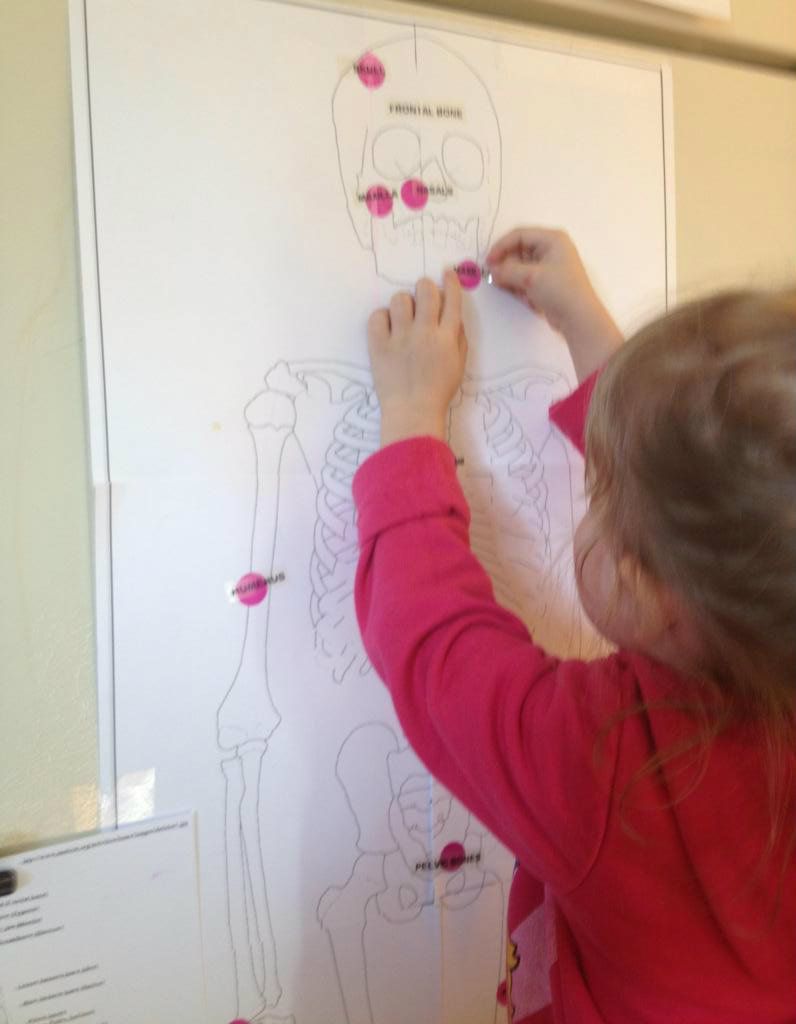
A while ago I came across a printout of the bones in the human body. You can find the file pinned to my Pinterest on the Human Body board here. It prints on 6 pages and you simply tape it all together. I have been meaning to do the activity with my kids since Halloween but life got in the way. Well, in the last month we began watching some Amamaniacs learning songs on Youtube that I remembered by from childhood. The kids LOVE them! They are fun and we are starting to learn the words although they are sung very quickly. One of their songs is about learning the bones in the human body. Although not all of the names match up exactly (they say finger bones vs. phalanges, etc) many of them do and it's [i]greatly[/i] boosted their interest in learning the names of the bones! (FYI- The word evolution is mentioned once in the song for those that are sensitive to secular influences.)
I printed out the skeleton on cardstock and then added a colored dot on every place that needed labeling to act as as a visual cue. I then created labels using my label maker for simplicity, but of course you can just write them directly on the print out, on blank labels, or your could get creative and even make your own magnet labels for repeated use.
The kids matched up the labels using an answer key and generally had a great time! I have been reinforcing the bone names with Owen especially whenever we pass through the kitchen and it usually ends in tickling, giggles, and lots of hugs. :) "Where is Owen's frontal bone? Where is Mommy's patella?" and so on. The only downside is that the refrigerator is a dangerous place to hang paper in regards to spills and things, but I don't intend for it to last forever so I didn't bother laminating it. Overall, it's been a super project and we are having fun solidifying their knowledge of the bones. Give it a try with your kids!
Did you know that stimulating your baby's VISION is a great way to stimulate her BRAIN?
Newborn babies are born with retinas that are not fully developed. Your retina helps you differentiate color in the world around you, but a baby's immature retina can only detect high contrasts between black and white, or light and dark objects. Those sweet baby pinks and blues you picked out to decorate the nursery? Your little one just sees them as one great big pastel blur!
So what can you do? You can provide your baby with lots of black and white images to enjoy, such as these: FREE PRINTABLE FLASHCARDS
From there, simply click the yellow BrillBaby tab as shown here:
And then scroll down to the bottom of the page.
If you prefer,
durable glossy versions of the infant stimulation cards are available in
the forum shop for $15.
Babies crave input to stimulate their brain development
and the brain builds itself by forming connections. Of all the five
senses,
vision takes the longest to develop but it also has the highest impact
on the brain. The more visual stimulation your child receives...the more
her neural network will expand and connect. A well connected brains
results in a smart baby! With continual stimulation, your baby's retina,
optical nerve, and visual parts of the brain will blossom from the use
of high contrast images.
Lately we have been practicing more skip counting with
the kids using Little Math and reinforcing the lessons with our abacus. We also use some youtube videos, as well. There are a few learning playlists available on my channel, including skip counting, at www.youtube.com/teachingmytoddlers. While you can count with any manipulatives or household items, what I like about the
abacus was that there is no mess to clean up afterwards. However, the abacus just didn't seem to be
as effective as it could be. I decided a long time ago I should paint it, but I finally buckled down and took a
few hours out of my morning to actually do it. I used one of the kids' paintbrushes and it's
definitely a mediocre, amateur paint job. I suppose I could
have just replaced the beads with colored beads from a craft store, but I used
what I had on hand didn't cost me a cent out of pocket.
It started out looking like this-
I
originally started to paint it with the beads on, I was
feeling lazy
and didn't want to go through the hassle of trying to take the thing
apart.
However, right away I could tell that it was going to be a pain and
was
better off taking it apart. Turns out, it only required a screwdriver
and about a
minute to easily disassemble it. Plus, this allowed me to separate the
beads
to paint the lighter colored beads yellow and the darker colored beads
blue. I slid them on
bamboo barbeque skewers to dry and spray with a clear coat. I could
have used any color paint I suppose, but I chose RS colors in case I
decided to use their iphone/ipad app or official workbooks in the
future
things would match.
Using
the supplies you have around the house will save you money if that's important
to you, but using spray paint versus a brush will speed up the process a lot
and save the frustration of multiple coats to cover the red, for example. I
happened to find some spray primer in the shed AFTER the fact and it would
have really helped to get the paint to stick easier, I wish I had found it
sooner.
The results of this paint job were profound and instantaneous! I highly recommend dismantling
a rainbow abacus you may have at home to paint or slide on new beads. It really
helps my kids learn to think in 5's and 10's and it also helps ME teach more
effectively when sliding the beads around for skip counting. It is sooooo much easier to count on this thing now! The kids'
interest in math has risen dramatically from just a few coats of
paint. It was time well spent and I only regret not doing it sooner. It's perfect to let my daughter use to help her solve equations in her early learning math workbooks. It's so sturdy that I have no qualms about letting the kids play with it until their hearts content and today Lily was happily "teaching Daddy." Here is the finished product:
So, go be inspired and take apart your abacus that is just collecting dust and slap some paint on it!
You'll be glad you did.
---------------------------------------
Just the other day I decided to do this again, this time modifying a M & D into a Japanese soroban. It's not ideal, but they are traditionally just a bit too small for my son's hands right now as he is still building up his fine motor skills more and more everyday (he's almost 3). I had to enlist my husband's help as a handyman but of course I did all the painting. They were infinately easier to paint with spraypaint! And although it's difficult to tell in the picture, they look soooo much prettier compared to first one where I used a paint brush. Here's the finished product-
(I have no idea why this is posting sideways)I painted the beads to match the www.MathSecret.com bead colors. You can download their e-book and practice on the webbased program for 10 minutes daily at no cost. Simply create an account and then add multiple students in it so each child's progress is tracked separately for the timed tests on each level. However, do NOT get their "free, you only pay shipping, too good to be true" abacus. It's JUNK. Check it out!
If you are looking to teach your little one to read but don't know where to begin, here are my top recommendations to make it as EASY as possible. I taught both of my kids how to read as during their infant/toddler years and they were able to sound out novel three letter words by ages 15-18 months old. You can begin teaching reading from around age 3-6 months and up.
1. CORE CURRICULUM - 10 Minutes Daily
Little Reader software is hands down this THE most versatile reading program around. If I could only have one program, this would be it. It offers tons of vocabulary (3,000 words), pattern phonics, is customizable and infinitely expandable. Basically, you just sit down with your child for 10 minutes a day and go through the interactive lessons on your computer or Ipad. Read the storybooks together which correspond to the software, and use the sticker labels to put up around your house. It's a pretty comprehensive program.
Regardless, the more CONSISTENT you are and the more you LAYER the learning, the quicker you will see results. Having said that, I applied the "immersion method" to literacy. I didn't just use software...I used software, books, flashcards during most mealtimes, youtube videos, DVD's, etc. and the whole process was very quick and painless as a result of the constant reinforcement.
2. SUPPLEMENTAL CLIPS AND DVD's
I had my kids watch about 3 minutes of youtube phonics songs 3-5 times a day for a month or so and they learned all of their basic letter sounds. You can use the phonics playlist here on my youtube channel or this one from Super Simple Songs .
You do NOT need to buy all of these programs below, but its nice to have a couple and rotate them. Your library may carry some, so check out your local branch. When your child has mastered the material, let them graduate and move on! Retire it and learn something else with a new DVD.
LEAPFROG
I LOOOOOVE pretty much all of the leapfrog videos. They teach phonics, blending, even math concepts. Be sure to get the flashcards too for reinforcement or print your own here.
Top picks for teaching letter sounds are Phonics Farm for the under 2 crowd and Talking Letter Factory for 2+. The whole set is an awesome investment and your child will learn so much more than anything shown on broadcast TV. Every close friend and client I know with older toddlers and preschoolers report that it look their child 1 month to as little as 1 week to learn their letter sounds with Leapfrog! I am a huge fan of their Tag pen, too that reads aloud to the child.
MY MONTESSORI HOUSE
My Montessori House videos are great because they have *tons* of blending examples. I especially love their demonstrations of silent e words in level 2 (kit/kite, rob/robe, and so on) and all of the wonderful unique shapes they teach on the shapes and colors DVD (the words are also blended sound by sound on screen).
Preschool Prep
Preschool Prep videos tend to be simplified and slower, I like them because there is no storyline really, just fun, memorable characters. They are easy to follow and great for really little ones especially although any child can use them.
Their Meet the Sight Words DVDs 1, 2, and 3 are super for kids learning their most common sight words and their easy reader books are very, very good too. I am a big fan and I think I own everything they've ever sold!
Your Child Can Read
This is the sequel to the ever popular "Your Baby Can Read." Your Baby Can Read Reviews are all over the internet, but BrillKids Little Reader covers all of the YBCR words (a few hundred) and many, many more (a few thousand). So if you have it laying around, go ahead and use it, but I wouldn't go buy it because there the programs directly overlap. Now, Your CHILD Can Read? It's full of really cute phonics songs. The pace is pretty quick, it covers *tons* of word in each DVD with lots ofsentences and song lyrics being flashed on screen. It's entertaining and informative, but will need to be watched many times before it all sinks in. Overall, it's really good and we love it!
You can also look into using free online resources such as www.starfall.com and www.readingbear.org depending on your child's age. Overall, just immerse your child in literacy opportunities and you will be shocked at how quickly they learn!
Can I just say I <3 BrillKids Little Musician?
It helped give my kids perfect pitch, how could I not!
I fell in love with Little Musician when it first came out-- you can read and watch the very detailed full review here. Now I want to share how to make the most out of using the program's solfege nursery rhymes. Lots of people either miss this aspect entirely or don't know where to find them. They are a hidden gem you should not overlook. Solfege is the time tested universal language of music and NO other program offers anything like this--it's awesome!
From the main Little Musician screen: go to PLAY EDIT > MUSIC NOTES > CHILDREN'S SONGS.
Start with one or two songs and learn them by heart. You will probably have to play them very slowly initially but soon you will be able to zip along at full speed! Don't get frustrated if you can't keep up, just use repetition until you and your child can. Don't forget you can change the tempo manually all the way down to a
snail's pace to be even slower than the "slow practice" version preset. Once you learn them by heart, sing them in the bath, at breakfast, in the car, and on and on and on.... :)
Here's some screen shots to walk you through.
PLAY EDIT
MUSIC NOTES
CHILDREN'S SONGS
Okay, that's all for now. Stay tuned for the next installment of LMs ideas. :) This is the 2nd time I've moved my blog this year so it's EMPTY again (waah!). Be sure to resubscribe if you want to get the latest updates if you were previously subscribed at my old blog. Thanks!
New to Little Musician? Take the two week FREE TRIAL of Little Musician and other BrillKids programs, save 10% on all purchases with discount coupon code BKAFF40902. Happy teaching!

.JPG)
.JPG)
.JPG)